So you have decide to enter the realm of computer programming! I hope that you find this tutorial helpful to learn the Visual Basic language. It is a very simple language to learn, but very powerful. I have also created this tutorial for people who are already experienced, but still want to know about things they may not have thought about. I will try to teach you as much as possible. It may take a long time to understand the more advanced coding procedures which we be shown much later in this tutorial, but I designed this tutorial to teach a new-comer AND an experienced user.
Visual Basic is an Object-Oriented Event-Driven language. This means that the language uses objects, either placed on the program's interface or objects created with coding, and code is executed through events. An event is simply what the user does. For instance, the Click event executes the code within the event when the object is clicked. The Keypress event executes code when the user presses a key on the keyboard etc. Please note that this tutorial is based from Visual Studio 2005. If you are using a older or newer version, some of the steps may not be right on track.
Enough talking... lets do some programming!
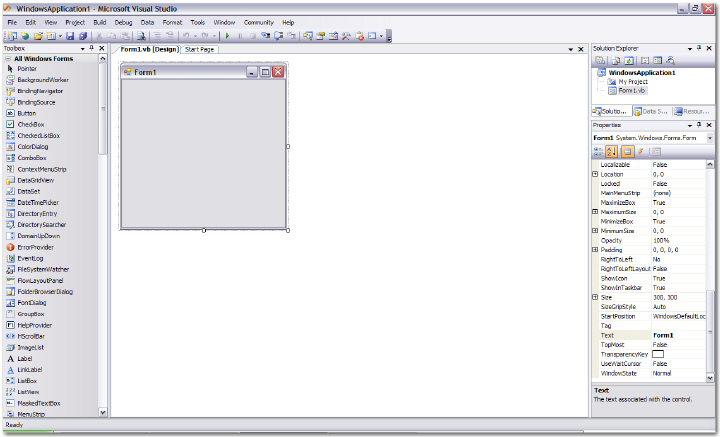
Your interface now appears like this:
On the left side you see the toolbox (lists the available objects to place on the form). Underneath the menu bar (containing File, Edit, View etc.) is what we call the Standard Toolbar. You can simply move the mouse over each icon to see some tool-tip text (pop-up text that tells you what the button does that the mouse is over). The white space you see with the form on top is our design area. This is where the form opens and where we can add objects to it. In the upper right corner is the Solution Explorer. This window contains the files included in your current project. Files may include class modules, forms etc. Notice the buttons on top of the Solution Explorer. You can move the mouse over the button to see what they do. Each button does something differently for each object in the project explorer. Certain buttons are available for certain objects. The view we are currently looking at is the Design view (as indicated in the upper-left tab where the form rests). Notice that if you select a different object in the project explorer, Design View is not available. Design View is for forms only. The form is what we use to design our application with, so this is not a problem. Underneath the Solution Explorer is the Properties window. This contains a list of all available properties for the selected object.
When you do not see a window on the screen that you need to use, select View, then choose the window you wish to see. Shown above are the most important windows.
To run the program, press the Run (the play icon) button on the Standard Toolbar. You can also press the F5 key. I recommend to navigate through the menus in Visual Basic to find out shortcut keys and to become more familiar with the interface. Use the keys (i.e. Ctrl S to save) and click menu items to find out what they do. Just press a Cancel button if you feel you are getting in too deep.
Objects:
Because this is object-oriented programming, we need some objects to drive the program. While the form itself is an object, it is easier to use simple events for a beginner, while you will need to learn more to use less active objects.
You can also click an object once, then click and drag the icon in the desired location on the form. Once you have added an object,
I just wanted to show you how to do this before I move on to the next step. Don't forget to save if you did not already from the review above. To save a project,
Doing this saves all files in the project.
Now lets use the properties.
The form has many properties that can be used. A property determines the behavior of an object. For the moment, I will only use a few.
The Name property is very important in programming. The Name property gives every object on the form and the form itself an identifier. The objects name is used in coding in order to control its behavior.
As you see, this displays text in the title bar of the form. The text entered in the Text property is also the same text that appears in the icon for the program in the Windows taskbar.
This makes the frame non-sizable during runtime. Some people may not like this, but I personally like to keep the frame one size.
You may have noticed that the three icons in the upper-right corner of the form were reduced to one. To fix this:
If you click the form, notice that the square (the maximize box) is faded, which means it is disabled. This makes the form a permanent fixed size.
If you run the program, you will notice that you can only minimize and close the form. As mentioned earlier, to run the program, press the Start button on the standard toolbar. Press Stop button to quit. You can also press F5 to run the program.
Now stop the program. I recommend that you try using other properties' values in order to become familiar with them. Don't forget to save.
I will continue on the Next Page.
|
Page 1 | Page 2 | Page 3 | Page 4 | Page 5 | Page 6 | Page 7 | Page 8 | Page 9 | Page 10 | Page 11 |
|
Page 12 | Page 13 | Page 14 | Page 15 | Page 16 | Page 17 | Page 18 | Page 19 | Page 20 |
|
Page 21 | Page 22 | Page 23 | Page 24 | Page 25 | Page 26 | Page 27 | Page 28 | Page 29 | Page 30 |
|
|