In the previous two pages, you learned how to use sequential access data files. Another form of data files (.dat) are random access files. Random access files store records in a data file that can be retrieved in any order. Any record in the file can be retrieved directly instead of reading the file starting at record 1. A specific record is accessed by using a specific record number. Random access files are also referred to as direct access files for this reason. To learn how to use random access files, we are going to make an appointment calendar. To tell you ahead of time, this is going to be a long tutorial, but it is necessary to gain a thorough understanding of the uses for these files.
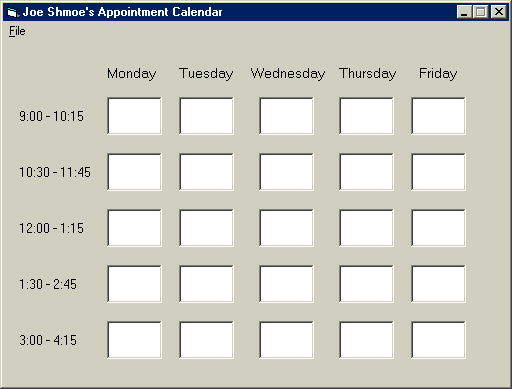
Set up the interface below:
Set the form's Width property to 7680 and its Height property to 5550.
Set the form's BorderStyle property to 1-Fixed Single and its MinButton property to True.
Set the form's StartUpPosition property to 2-CenterScreen.
For the WHITE labels you see, first place only one on the form, then name the label lblSlot
Set the label's BorderStyle property to 1-Fixed Single.
Set the label's Alignment property to 2-Center.
Set its Index property to 0.
Make sure that the label is selected, then copy the label by pressing Ctrl then C.
Paste the label by pressing Ctrl then V.
Arrange the labels as best you can according to the image above. The labels should be arranged according to their index number, incrementing left to right. The label in the upper-left corner should be index 0, the label to the right of it index 1, and so forth.
Place only one label on the form to indicate the time slots (the labels to the right of the ones we place).
Set the Caption property to 9:00-10:15.
Name the label lblTime.
Set its Index property to 0.
Place it as seen in the image.
With that label selected, press Ctrl and C, then Ctrl and V to paste them. Do this until you have five as seen in the image above.
Set their captions as seen above.
Place another label on the form and name it lblDay.
Set the label's Index property to 0.
Copy and paste that label as you did with the other labels in the steps above and place them as seen.
Set the captions for the labels as seen in the image above.
Do your best to arrange the objects as seen above.
Highlight all the square labels you placed and set their Visible property to False.
It may seem to you that something is missing. That is because we are not going to use any command buttons for this particular exercise. We are going to use the Click event for each label instead. I am also going to show you how to use common dialogs and menu controls. You will learn more about these controls later when we recreate Notepad (more or less) on the next pages.
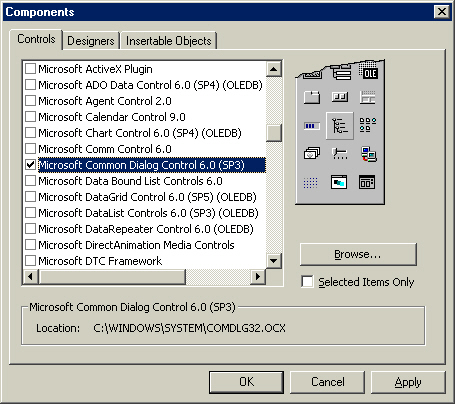
Click on the Project menu, then select Components. You may also press Ctrl then T, but I want to make sure that you know where this option is located.
On the Controls tab, select Microsoft Common Dialog Control 6.0 (SP3).
Click OK.
You now have a new tool on the Toolbox. This object allows the use of common dialogs. Common dialogs are the windows that exist in about every application in Windows, thus the name Common. These include the Open dialog, Save As dialog. They are pre-programmed into windows, allowing any application in development to display them.
Double-click the new control on the toolbox (the last control) to add it to the form.
Place it in the upper-left of the form.
Lock the controls on the form.
Name the dialog tool dlgAppointments (dlg is the three-letter identifier for the common dialog tool).
Now we will set up the menu on the form.
Select the form, then name it frmAppointment.
Click on the third icon on the standard toolbar (bar below the menu for Visual Basic).
In the Caption textbox, type &File.
In the Name textbox, type mnuFile.
Be sure that only the Enabled and Visible checkboxes are checked.
Click the Next button, then click the right arrow.
This creates menu items under the File menu.
Set the caption to &New.
Name the selection mnuFileNew.
Select the Shortcut combo box and select Ctrl-N.
This allows the user to press Ctrl then N to execute the code in the New option of the file menu.
Click the Next button.
Set the caption to &Open.
Name the option mnuFileOpen.
Set the shortcut to Ctrl-O.
Press the Next button.
Type a hyphen (-) in the caption text box.
Name it Hyphen.
The hyphen creates a separator bar in the menu.
Click the Next button.
Set the caption to &Exit.
Name the option mnuFileExit.
Click OK.
You now have a menu at the top of your form. These menu options work the same way as any object. Use the click event to have each option execute code.
Click on the File menu then select Exit. This opens the code window for that menu option's click event.
Press tab, then type End.
Before we continue coding this form, we are going to add another form.
Add a new form to the project.
Review: Project > Add Form
Set the form's BorderStyle to 3-Fixed Dialog (you probably expected the other usual settings; not this time!).
Name the form frmInfo.
Set the form's StartUpPosition property to 2-CenterScreen.
Set the form up as seen below.
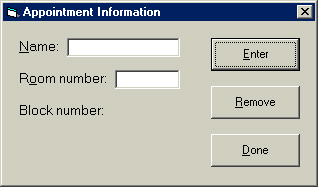
Name the command buttons appropriately as follows:
cmdEnter
cmdRemove
cmdDone
Name the top text box txtName and the bottom text box txtRoom.
Name the top label lblName, the next label down lblRoom, and the last label lblBlock.
Set the Index property of lblBlock to 0.
Place another label to the right of lblBlock and name it lblBlock.
Set the TabIndex properties of the objects as follows:
lblName: 0
txtName: 1
lblRoom: 2
txtRoom: 3
cmdEnter: 4
cmdRemove: 5
cmdDone: 6
Lock the controls on the form.
As you may have guessed, the program is going to retrieve information from the frmInfo form. Therefore, we need to use global variables (every form can use them). We do this using a code module. To add a code module to a project:
Select the Project menu, then choose Add Module.
Click Open.
Type the following lines:
Type ItemStruc
strName as String * 20
strRoom as String * 3
End Type
The line you just typed creates two global variables called strName and strRoom as the string datatype. These variables are going to store the entry the user makes into the form we just completed, then write them to a random access file so that we can store various names and room numbers. They are part of a Type, which is simply a collection of variables. We need to use these two variables this way because we can only write one thing to the data file. The multiplication sign, or asterisk(*), does not mean multiply when we use them like this. They mean assign this many characters to the length of the string variable. The variable strName is twenty characters long, and strRoom is three characters long. If we declared these two variables using a Public statement, we cannot write both variables to the file. The Public keyword declares global variables when used in a code module. If we use it in the General Declarations section of a form, it only creates form-level variables. If we use the Public keyword in a sub-procedure or function, Visual Basic displays an error.
Double-click on one of the white squares (labels) on the larger form to open the code window for that object.
Press tab, then type the following lines:
Dim udtAppStruc As ItemStruc, intSlot As Integer
intSlot = Index + 1
frmInfo.lblBlock(1).Caption = intSlot
If lblSlot(Index).BackColor = &HFFE391 Then
Get #1, intSlot, udtAppStruc
frmInfo.txtName.Text = Trim(udtAppStruc.strName)
frmInfo.txtRoom.Text = udtAppStruc.strRoom
Else
frmInfo.txtName.Text = ""
frmInfo.txtRoom.Text = ""
End If
frmInfo.Show
Line 1: Creates the variable udtAppStruc as the ItemStruc
data-type, and the variable intSlot as an Integer. Recall the code
we entered into the code module. The variable udtAppStruc uses the
entries we made in the Type ItemStruc declaration in the code module
because we tell udtAppStruc to be declared AS ItemStruc.
Line 2: Sets the variable intSlot to Index + 1. Notice in
the first line of the sub-procedure that it says Index as Integer. This
is called a parameter, or argument. Since the sub-procedure
automatically declares this variable, we may use it. Index is simply the
identifier for the particular label that the user clicks on. We add one to the
index because intSlot is later used to specify the record number, and we
have NO record 0.
Line 3: Sets the label caption of lblBlock(1) on the other form (frmInfo)
so that the form may use the value in code as well because we have NO record 0.
Line 4: Tests to see what color the label is that the user clicks on.
Line 5: If it is light blue (&HFFE391), then read (Get)
file number one, looking at the value of intSlot and the data in udtAppStruc.
The random access file knows where to look because it will find the value of
those variables, so it is not too important why this works except for the reason
just stated. Basically, the computer reads the data from the file using the
values of the two variables specified (which were written when the user enters
data).
Line 6: Set the text of the text box txtName on the form frmInfo
to the data in strName in the type udtAppStruc, then trim (delete)
the spaces before and after any characters typed in. Recall that we set the
variables to a fixed length in the Type declaration in the code module.
If the user enters something shorter than the amount of space we specify to the
string, there will be spaces after the text. The trim function gets rid
of those spaces.
Line 7: Set the text in the text box txtRoom on the form frmInfo
to the data in strRoom in the type udtAppStruc.
Line 8: Otherwise, (if the color of the label is not blue, therefore
white).
Line 9: Clear the text in the text box txtName on the form frmInfo.
Line 10: Clear the text in the text box txtRoom on the form frmInfo.
Line 11: End the If statement.
Line 12: Display the form frmInfo.
Click on the file menu on the form, then select Exit to open the code window.
Press tab, then type End.
In the Object Box of the code window, select mnuFileNew.
Press tab, then type the following lines:
On Error GoTo CancelError
dlgAppointments.Flags = cdlOFNOverwritePrompt
dlgAppointments.Filter = "Data (*.dat) | *.dat"
dlgAppointments.ShowSave
On Error GoTo CancelError
Dim intSlot As Integer, udtAppStruc As ItemStruc
udtAppStruc.strName = Space(20)
udtAppStruc.strRoom = Space(3)
Close #1
Open dlgAppointments.FileName For Random As #1 Len = Len(udtAppStruc)
For intSlot = 0 To 24
Put #1, intSlot + 1, udtAppStruc
lblSlot(intSlot).BackColor = vbWhite
lblSlot(intSlot).Visible = True
Next intSlot
CancelError:
Line 1: This is a standard error handling code structure.
It tells the program to go to the label CancelError, which is at the last
line of the code. It skips over all the code between line 1 and CancelError:
at the bottom. If the user presses the cancel button, the code in the
sub-procedure is still processed. If the user selects Cancel for
instance, their is no file to open. As you see on line 11, the code opens
a file. The program cannot open a file with no file name, therefore creating an
error because of what is typed in the code, not because of how the common dialog
works.
Line 2: This uses the flags option for the common dialog, which
allows the programmer to specify the options available in the common dialog.
Line 3: Uses a filter in the common dialog. Go to the file menu in Visual
Basic. Choose Open Project. When you are prompted to save, say NO.
Do not worry... this will not close your project. You will safely get back to
it. In the combo box (drop-down arrow) next to Files of Type are a list
of two file types. This code does the same thing as this dialog.
Line 4: Displays the common Save As window.
Line 5: Go to the label CancelError in the last line of the
sub-procedure to avoid processing the data below, thus avoiding an error.
Line 6: Declare intSlot as an integer and udtAppStruc
as ItemStruc (the type we created earlier).
Line 7: Clear the variable strName in the type ItemStruc
created earlier. We assigned twenty spaces, now we set equal to twenty spaces,
thus clearing the variable
Line 8: Clear the variable strRoom in the type ItemStruc
created earlier. We assigned three spaces, now we set equal to three spaces,
thus clearing the variable.
Line 9: Close file number one. This is necessary to open another file.
Line 10: Open the file selected in the common dialog for Random
access as file number one, setting the length of the file to the
length of the type udtAppStruc. This allows the file to be read up to a
certain point because the program now knows how long the file is.
Line 11: Begin For Next loop; use intSlot for values 0
through 24
Line 12: Write to file number one (Put) one greater than intSlot,
then the data in udtAppStruc
Line 13: Set the color of the label with the current value of intSlot
to white (all the labels).
Line 14: Display the label with its current index value at intSlot.
Line 15: Integrate loop; go to the next value of intSlot.
Line 16: Set the label for CancelError, which the code is set to go to on
lines 1 and 5.
Select the object mnuFileOpen in the object box of the code window.
Press tab, then type the following lines:
On Error GoTo OpenErrorHandler
Dim intSlot As Integer, udtAppStruc As ItemStruc
dlgAppointments.CancelError = True
dlgAppointments.Flags = cdlOFNFileMustExist
dlgAppointments.Filter = "Data (*.dat) | *.dat"
dlgAppointments.FileName = ""
dlgAppointments.ShowOpen
Close #1
Open dlgAppointments.FileName For Random As #1 Len = Len(udtAppStruc)
frmAppointments.Caption = dlgAppointments.FileName & " - Joe Shmoe's Appointment Calendar"
For intSlot = 0 To 24
lblSlot(intSlot).Visible = True
Get #1, intSlot + 1, udtAppStruc
If udtAppStruc.strName <> Space(20) Then
lblSlot(intSlot).BackColor = &HFFE391
Else: lblSlot(intSlot).BackColor = vbWhite
End If
Next intSlot
Exit Sub
OpenErrorHandler:
Line 1: Go to the label OpenErrorHandler at the end of the
sub-procedure when an error occurs
Line 2: Declare variable intSlot as an integer and udtAppStruc
as ItemStruc (the Type we created earlier)
Line 3: Set CancelError of the common dialog to true.
Line 4: Set the Flags property of the common dialog to confirm
that there is a file selected.
Line 5: Set the Filter property of the common dialog to Data
(.dat) files, which will appear in the combo box in the Open
dialog. The part before the vertical line (Data (*.dat)) is what is
actually displayed in the Files of Type combo box on the Open
dialog. The part to the right of the vertical line is the filter type, which
means that the dialog will only display those type of files in the Open
dialog.
Line 6: Set the file name to a blank in the common dialog control dlgAppointments.
No file will show when the user selects Open from the menu.
Line 7: Display the Open dialog.
Line 8: Close the file currently open.
Line 9: Open the file that the user selects in the Open dialog
(read through the common dialog control dlgAppointments) for random
access as file number one, setting the length of the file to the length of udtAppStruc.
The length is determined by what has been written to this type when data
was entered in the file. The file stores this as we did earlier.
Line 10: Set the caption of the form to the file name we selected in the Open
dialog, plus (&) Joe Shmoe's Appointment Calendar.
Line 11: Begin For Next loop, using values of the variable intSlot
from 0 to 24.
Line 12: Display all labels (they are indexed 0 through 24, and that is
the same range of the loop).
Line 13: Read file number 1 (Get), using the current value of intSlot
plus one because the record is one greater than the index of the labels,
then store that data in the udtAppStruc type. Recall that we had to use a
Type to do this. We may only assign one thing to be read, and udtAppStruc
consists of all the data we need. A single variable can only store one type of
data.
Line 14: Test to see if the variable strName does not equal
(<>) twenty spaces (which means there IS something written there).
Line 15: If the above is true (there are no spaces), set the color of the
label lblSlot to light blue (&HFFE319).
Line 16: Otherwise (else), set the BackColor property of
the label lblSlot to white.
Line 17: End the If statement.
Line 18: Increment the loop; go to the next value of intSlot.
Line 19: Exit the sub-procedure so that the program does not process the
label.
Line 20: Sets the label for the code to go to, which is specified in Line
1. The label does not execute any code because their is nothing beneath it.
I hope you enjoyed this tutorial on Random Access Files. If you still have the energy, move on to Page 19.
How do you like this tutorial? Are you learning this language easily? Please let me know via e-mail at webtechjava@yahoo.com.