Now that you have written some code, it is time to put programming to use. But first, let's build the interface for the application:
With your previous project open, select the menu Project > Add form
Make sure that the Windows Form icon is selected; press enter or click OK.
Name the form frmCarpentry
Set the FormBorderStyle property to Fixed Single and the MinimizeBox property to True.
Set the form's caption to say Joe Shmoe's Carpentry by setting the form's Text property.
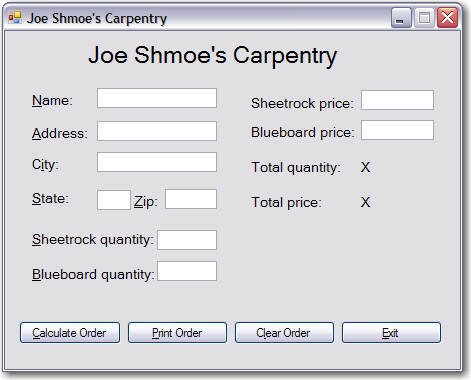
Add four command buttons to the form and order them along the bottom of the form horizontally. See below.
Add five labels to the form. You will actually add more, but I don't want to clutter your form. Refer to the image below
Position one label at the top of the form centered as best you can make it. See below.
Name that label lblTitle. Type Joe Shmoe's Carpentry in the caption for the label.
Position all the labels vertically on the left side of the form.
Set the AutoSize property to True for all labels.
Set all the labels Font Size to 10
For the label lblTitle, set the Font Size to 18 by
Clicking the plus next to the Font property
Enter 18 in the Size property.
Add other objects as appropriate according to the image below. Be sure to add labels to the right of the "Total Quantity:" and "Total Price:" labels in order to display the figures when we program the application. Set their AutoSize properties to True.
Name the label displaying "Total quantity:" lblQuantity and the label displaying "Total price:" lblPrice.
Name the labels to the right of the "Total Quantity:" and "Total Price:" lblTotalQuantity and lblTotalPrice.
Lock the controls.
Recall: Format > Lock Controls.
OR
Right-click on the form and select Lock Controls.
Before we code this application, lets set up the access keys. Recall that the "&" (ampersand) enables the corresponding letter in the objects caption property as an access key. Add the "&" to the following text in the corresponding label object's caption property:
&Name:
&Address:
&City:
&State:
&Zip:
S&heetrock quantity:
&Blueboard quantity:
Sheet&rock price:
Blueb&oard price:
Notice the buttons in the image above. I started doing them myself and forgot to mention them in the tutorial. Change them accordingly.
Example: "&Calculate Order"; "&Print Order"; etc. I missed the Calculate Order too!
Hope you are having fun, because now we can move onto Page 5!