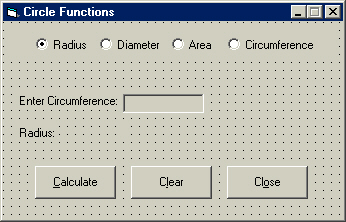
In this tutorial, I created more of an exercise more than new material. You will create the program above, which I am taking you through. This exercise is a test of you ability to understand a few math functions, particularly with circles. It also includes a simple loop. Once again, this tutorial is a bit long, so be sure you have the patience today. Let's begin.
Open a new project and name the project Circles.
Name the form frmCircles.
Set the form's BorderStyle to 1-Fixed Single and its MinButton property to True.
Set the form's Width property to 5190 and its Height property to 3330.
Set the form's Caption property as seen above (Circle Functions).
Notice that all the option buttons are sitting on a rectangle. That object is a frame, which is used to group related objects together.
Double-click the frame tool in the tool box to add it to the form.
Set the frame's BorderStyle to 0-None.
Set the frame's Width property to 4815 and its Height property to 375.
Position the frame on the top of the form as seen above (it is the rectangle beneath the option buttons)
Double-click the option button tool four times to add four to the form.
Spread them out and select them all.
Press Ctrl and X to cut them.
Select the frame on the form.
Press Ctrl and V to place them in the frame. This groups all the option buttons in the frame.
Add three labels to the form and place them as seen above. Be sure to notice the smaller label to the right of the label displaying Radius: under the text box in the image
Set their captions as seen above. Don't forget the colon.
Name the label displaying Enter Circumference lblEntry.
Name the text box to the right txtEntry.
Name the label below lblEntry as lblFunction.
Name the label to the right of that label lblResult.
Name the command buttons as you should expect:
cmdCalc
cmdClear
cmdExit
Set the command button's captions as seen above. Be sure to notice the access keys.
Name the option buttons as follows from left to right:
optFunction(0)
optFunction(1)
optFunction(2)
optFunction(3)
Recall that the number in parenthesis is set by assigning a number to the index property.
Now let's code this application.
Open the code window for the object cmdClear.
Enter the lines below:
lblEntry.Caption = "Enter Circumference:"
txtEntry.Text = ""
lblResult.Caption = ""
optFunction(0).Value = True
Line 1: Sets the caption of the label lblEntry to Enter
Circumference.
Line 2: Clears the text box txtEntry.
Line 3: Clears the label lblResult.
Line 4: Sets the value of the option button optFuntion(0) to true.
Note on option buttons:
You may already know that option buttons are the other form of checkboxes. However, only one option button in its group can be selected at a time. The value property is only True or False.
Code the command button cmdExit to end the application.
Now we will code the command buttons.
Open the code window for the right most option button (the one reading Radius).
Notice that the first line reads Private Sub optFunction_Click(Index As Integer). This indicates that the object is indexed and has multiple parts. Since they are indexed, this sub-procedure encompasses all the option buttons. The code will directly look at which option button is selected.
Now we will get this thing working.
Type the following lines:
Dim intIndex as Integer
For intIndex = 0 To 3
If optFunction(intIndex).Value = True Then lblFunction.Caption =
optFunction(intIndex).Caption + ":"
Next intIndex
Line 1: Looks at indexes 0, 1, 2,
and 3.
Line 2: Checks to see which option button is checked. Sets the label
caption of lblFunction to whatever the caption is of the selected option
button, then puts a colon at the end.
Line 3: Integrates loop; goes to next value of i (1 then 2 then
3).
Select (General) in the code window's object box.
Type the following line:
Const conPi As Single = 3.14
The line above simply creates a constant variable named conPi as the data-type Single and stores the value 3.14 in it. Constants store data in a container (conPi in this case) just like a variable, but the value never changes. Thus we have the name constant.
Now we will set up some functions.
A function is simply a set of commands that executes when it is called. Functions are usually designed to perform a certain task. While sub-procedures are the same as functions in many ways, they still differ. A function is called in coding, while a sub-procedure is usually executed by an object's event, such as click or LostFocus. A sub-procedure can take the place of a function if it is called, and vise-versa.
Press the enter key after declaring the constant above.
Type the following lines:
Private Function Radius()
lblResult.Caption = (Val(txtEntry.Text) / Pi) / 2
End Function
Line 1: Creates a private function called Radius
Line 2: Divides the value of the text in text box txtEntry by Pi,
then divides the entire result by two.
Line 3: Ends the function.
The function above calculates the radius. The user will be asked for the circumference. The formula for circumference is Pi * Diameter, so we reverse this by dividing Pi. That gives us the diameter. The radius is half the diameter, so we then divide the result by 2.
Press the enter key.
Type the following lines:
Private Function Diameter()
lblResult.Caption = Val(txtEntry.Text) / Pi
End Function
Line 1: Creates a private function called Diameter.
Line 2: Divides the value of the text in text box txtEntry by Pi.
Line 3: Ends the function.
The function above calculates the diameter. The user will be asked for the circumference. Pi * Diameter gives us the circle's circumference, so dividing the circumference by Pi reverses the multiplication, thus giving us the circles diameter.
Press the enter key.
Type the following lines:
Private Function Area()
lblResult.Caption = Val((txtEntry.Text) ^ 2) * Pi
End Function
Line 1: Creates a private function called Area.
Line 2: Squares the value of the text in the text box txtEntry,
then multiplies it by Pi. (Pi R Squared: Formula for circle area)
Line 3: Ends the functions
The function above calculates the area. The user will be asked for the radius. Pi * Radius^2 (Radius squared) is the formula for the area of a circle.
Press the enter key.
Type the following lines:
Private Function Circumference()
lblResult.Caption = Val(txtEntry.Text) * Pi
End Function
Line 1: Creates a private function called Circumference.
Line 2: Multiplies the value of the text in the text box txtEntry
by Pi.
Line 3: Ends the functions
The function above calculates the circumference. The user is asked for the diameter. Pi * Diameter gives us the circle's circumference.
Now let's code the cmdCalc sub-procedure.
Type the following lines in the cmdCalc sub-procedure:
If optFunction(0).Value = True Then Call Radius
If optFunction(1).Value = True Then Call Diameter
If optFunction(2).Value = True Then Call Area
If optFunction(3).Value = True Then Call Circumference
lblResult.Caption = Round(lblResult.Caption, 3)
Lines 1-4: Depending on the option button selected, it
will call (execute) a specific function that we constructed above.
Line 5: Rounds the result in lblResult to 3 decimals.
The keyword Round is another Visual Basic function, just like Val or Mod. It is more precise than integer division, which rounds a number to the nearest whole number. The number you specify after the object is the amount of decimal places the calculation will round the result to using the Round function.
I hope that your understanding of loops has increased a bit, as well as your mathematic abilities. It certainly will as we go through this tutorial more, because they will appear more frequently.
Now it is time to move onto Page 15.